Byggtråd: Ram
Hi everyone!
I thought my recent bike project might make an interesting read, since there does not seem to be too much frame building content in Happyride. I'm writing in english as my swedish is not really up to the task of actually expressing myself, but comments and questions are absolutely welcome in swedish. Also the timing of this thread is a bit odd, since the frame is already pretty much ready for finishing touches and has been ridden, but sure why not, here goes.
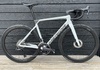
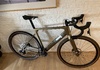
So, a bit more than a year ago I came to conclusion that my Fairlight Secan is not and never was the bike for me, and I was seriously looking for something to replace it.
After countless hours of internetting, headscratching and ruminating I came to the conclusion that currently the global bike industry is completely unable to sell me a bike that fits my requirements:
Event tho I've spent a bit of time in my life welding with mig, tig, stick and even some automotive industry grade glues, and brazed disc brake mount to a fork like ten years ago, I had never built a bike frame myself. But I know some people who have, so I got onto phone and called my buddy. Conversation went something like this:
- I think it might be time for me to grow up and stop riding bikes that have somebody elses name in the downtube.
"That took longer than expected."
- Yeah, so anyway, you mind if I ask for some help?
"No problem. But call Konga Bikes first and ask if they have any brazing courses scheduled, they can probably get you up to speed with making welds that don't suck a lot faster than me."
- Will do, talk to you later bye."
Off I went to talk with Antti Konga, who was happy to schedule a weekend course if there was enough participants. They put up an ad for it in yksivaihde.net and some other forums in Finland, and a couple of weeks later we locked a weekend at the end of January 2025 for two day course of brass brazing and basics of framebuilding. Time to start booking tickets to Finland then.
The course was held at Kongas workshop in Joensuu, Finland. The agenda was to teach the participants the skills needed for structurally sounds brass welds with oxy-acetylene within two days, starting from zero and ending with small project of each participants choise. One of the guys modified their old cross bike, one slapped a yoke in some Kona hardtail for ridiculous tire clearance and such. Since my own sights were set on a frame, somewhere in the future, it felt a bit futile to be tinkering with making a rack or something similar so I just focused on getting to lay as much fillets and seams with somebody elses acetylene and brass as I had time for, and cutting those seams open to see whats up. Welding is something one can get good at only by doing it, but the setup of experienced professional giving constant feedback over your shoulder as you are laying the seam is quite priceless. Or in this case it was not priceless, since we all paid for the course, but you get the point.
Towards the sunday evening my welds started to not suck, at least in my opinion. And Antti agreed.
Here is the only photo I took the entire weekend:

Luckily Antti was a bit more active with the camera: https://www.flickr.com/photos/kongabicycles/albums/72177720326080666/
So what next? We now kind of know how to do, just don't really yet know what. So we need a geometry and some drawings.
Naturally this means that next I ordered the materials for the frame.
Two hundred euros and a bit of delivery time later I got a parcel that I felt the need to tear open before I took my shoes off:

I decided to go with Columbus Zona for a myriad of reasons:
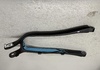
However, one of the chainstays had a not such a lovely curve in it. I could not really find any proper pictures of the chainstays in the interwebz, so I foolishly assumed that the chainstays being marked as drive side and non drive side surely has something to do with dents for chainring clearance or what not. But nope.
The non drive side chainstay was adorned with a big ass fucking dimple for a flat mount bracket.
Normally this would not really be an issue, you just buy the flat mount bracket that Columbus has specifically designed to work with this tubing and weld it in.
However, the customer in this case is a bit of an opinionated prick who happens to hate flat mount in biblical proportions. One of the first things that I nailed to my mood board when I started to plan this whole thing was to have an IS mount or post mount inside the rear triangle. So I'd have to buy another drive side chainstay.
Luckily I had some other reasons to make another order to biketubing.com - I just didn't know it yet. See, I originally wanted to have UDH dropouts in this bike.
None of the UDH dropouts that biketubing.com sold back then made me happy about having two functional eyes, so I started to look for alternatives. At one point I was fairly close to asking my friend in Los Angeles to order some Bolt On Brake Insert dropouts (they are actually called that) from Paragon and smuggle them to Stockholm, but then I took another look at the price and decided to find something else to blow my money on.
At this point I found very sketchy looking website called https://www.custom-academy.de/
Apparently it is run by people who used to work for Reset Racing, or something, and they had a fairly decent stock of frame building material. Including the Allotec C-82 dropouts, that I had seen in some US framebuilding webstores:

I eventually found a bike in custom frame forum that used these. The pictures did not really show the details, but they did not look thaaaaat bad so I decided to go with it. The mounts for fenders and rack look like warts but that can be solved by angle grinder. I also ordered some funky little inox strengthening diamonds to be placed under screw inserts and some tie downs for cable housing, as well as hourglass shaped fender and rack bosses. Good times, and this whole lot cost me a lot more than I care to say. Little bits add up quick and end up costing a lot more than one expects.
And then the little things show up and end up costing even more.
See, the Allotec C-82 are quite porky. Like really damn big. And heavy. And actually quite ugly. This would have been easily avoided if a) I had found some proper pictures of them in the internet, but since they were fairly new product at that point in time not many people had apparently built with them, or b) there had been CAD models available so I could have thrown them in Fusion360 to see how they line up with the tubes in the rear triangle or c) I had reverse engineered them from online sources and thrown them in Fusion as in option b. None of these options were chosen, I felt lucky back then.
They also had some minor sort-of-functional issues. The design of them causes the rear triangle to become asymmetric. Not like Cannondale doing Cannondale -things kind of asymmetric, just the chain and seatstays. After a bit of investigating I learned that this is a common issue with most UDH dropouts. If you wan't to learn more, look into the rabbit hole here: https://forum.customframeforum.com/t/udh-standard-or-scam/442
Sure, I maybe could live with the asymmetry, but I don't really want to since UDH was not really a deal breaker for me. And the brake mount kind of is.
The C-82 dropouts push the rear axle somewhat far back, and the landings for the stays don't have a lot of real estate to play with. In my intuition, and some hand drawings on millimeter paper, this would cause the rear triangle to not have space for post mount brake on the inside. So alternative dropouts are needed.
Well it's only money, and I needed to get the new chainstay anyway...
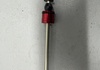
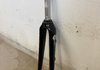
Back to biketubing.com and we end up with non-dimpled chainstay and some Paragon snap ring dropouts in steel:

These things are great for a couple of reason which I'll explain later.
But now I wan't to watch some One Piece, and this thing is taking way too long to write anyway, so I'll continue in the next episode where we take a look at the geometry and probably get into melting some brass.
-Emppu
I thought my recent bike project might make an interesting read, since there does not seem to be too much frame building content in Happyride. I'm writing in english as my swedish is not really up to the task of actually expressing myself, but comments and questions are absolutely welcome in swedish. Also the timing of this thread is a bit odd, since the frame is already pretty much ready for finishing touches and has been ridden, but sure why not, here goes.
So, a bit more than a year ago I came to conclusion that my Fairlight Secan is not and never was the bike for me, and I was seriously looking for something to replace it.
After countless hours of internetting, headscratching and ruminating I came to the conclusion that currently the global bike industry is completely unable to sell me a bike that fits my requirements:
- steering geometry suitable for all road riding, whatever the fuck that means but sounds adventurous
- tire clearance for approximately 40mm wide 622 tires with fenders
- possibility to have luggage for light touring
- sized to fit 182cm tall person with fairly average proportions, no missing limbs or titanium spine or anything
- does not aesthetically suck ass
Event tho I've spent a bit of time in my life welding with mig, tig, stick and even some automotive industry grade glues, and brazed disc brake mount to a fork like ten years ago, I had never built a bike frame myself. But I know some people who have, so I got onto phone and called my buddy. Conversation went something like this:
- I think it might be time for me to grow up and stop riding bikes that have somebody elses name in the downtube.
"That took longer than expected."
- Yeah, so anyway, you mind if I ask for some help?
"No problem. But call Konga Bikes first and ask if they have any brazing courses scheduled, they can probably get you up to speed with making welds that don't suck a lot faster than me."
- Will do, talk to you later bye."
Off I went to talk with Antti Konga, who was happy to schedule a weekend course if there was enough participants. They put up an ad for it in yksivaihde.net and some other forums in Finland, and a couple of weeks later we locked a weekend at the end of January 2025 for two day course of brass brazing and basics of framebuilding. Time to start booking tickets to Finland then.
The course was held at Kongas workshop in Joensuu, Finland. The agenda was to teach the participants the skills needed for structurally sounds brass welds with oxy-acetylene within two days, starting from zero and ending with small project of each participants choise. One of the guys modified their old cross bike, one slapped a yoke in some Kona hardtail for ridiculous tire clearance and such. Since my own sights were set on a frame, somewhere in the future, it felt a bit futile to be tinkering with making a rack or something similar so I just focused on getting to lay as much fillets and seams with somebody elses acetylene and brass as I had time for, and cutting those seams open to see whats up. Welding is something one can get good at only by doing it, but the setup of experienced professional giving constant feedback over your shoulder as you are laying the seam is quite priceless. Or in this case it was not priceless, since we all paid for the course, but you get the point.
Towards the sunday evening my welds started to not suck, at least in my opinion. And Antti agreed.
Here is the only photo I took the entire weekend:
Luckily Antti was a bit more active with the camera: https://www.flickr.com/photos/kongabicycles/albums/72177720326080666/
So what next? We now kind of know how to do, just don't really yet know what. So we need a geometry and some drawings.
Naturally this means that next I ordered the materials for the frame.
Two hundred euros and a bit of delivery time later I got a parcel that I felt the need to tear open before I took my shoes off:
I decided to go with Columbus Zona for a myriad of reasons:
- Everyone in the internet says it is easy to work with and forgiving tubing, especially good for first time builds or bikes that might take a bit of beating.
- Pretty much all my friends in Finland who build frames say it is easy to work with and forgiving tubing, especially good for first time builds or bikes that might take a bit of beating.
- It was quite a lot cheaper than any of the fancier stuff.
However, one of the chainstays had a not such a lovely curve in it. I could not really find any proper pictures of the chainstays in the interwebz, so I foolishly assumed that the chainstays being marked as drive side and non drive side surely has something to do with dents for chainring clearance or what not. But nope.
The non drive side chainstay was adorned with a big ass fucking dimple for a flat mount bracket.
Normally this would not really be an issue, you just buy the flat mount bracket that Columbus has specifically designed to work with this tubing and weld it in.
However, the customer in this case is a bit of an opinionated prick who happens to hate flat mount in biblical proportions. One of the first things that I nailed to my mood board when I started to plan this whole thing was to have an IS mount or post mount inside the rear triangle. So I'd have to buy another drive side chainstay.
Luckily I had some other reasons to make another order to biketubing.com - I just didn't know it yet. See, I originally wanted to have UDH dropouts in this bike.
None of the UDH dropouts that biketubing.com sold back then made me happy about having two functional eyes, so I started to look for alternatives. At one point I was fairly close to asking my friend in Los Angeles to order some Bolt On Brake Insert dropouts (they are actually called that) from Paragon and smuggle them to Stockholm, but then I took another look at the price and decided to find something else to blow my money on.
At this point I found very sketchy looking website called https://www.custom-academy.de/
Apparently it is run by people who used to work for Reset Racing, or something, and they had a fairly decent stock of frame building material. Including the Allotec C-82 dropouts, that I had seen in some US framebuilding webstores:
I eventually found a bike in custom frame forum that used these. The pictures did not really show the details, but they did not look thaaaaat bad so I decided to go with it. The mounts for fenders and rack look like warts but that can be solved by angle grinder. I also ordered some funky little inox strengthening diamonds to be placed under screw inserts and some tie downs for cable housing, as well as hourglass shaped fender and rack bosses. Good times, and this whole lot cost me a lot more than I care to say. Little bits add up quick and end up costing a lot more than one expects.
And then the little things show up and end up costing even more.
See, the Allotec C-82 are quite porky. Like really damn big. And heavy. And actually quite ugly. This would have been easily avoided if a) I had found some proper pictures of them in the internet, but since they were fairly new product at that point in time not many people had apparently built with them, or b) there had been CAD models available so I could have thrown them in Fusion360 to see how they line up with the tubes in the rear triangle or c) I had reverse engineered them from online sources and thrown them in Fusion as in option b. None of these options were chosen, I felt lucky back then.
They also had some minor sort-of-functional issues. The design of them causes the rear triangle to become asymmetric. Not like Cannondale doing Cannondale -things kind of asymmetric, just the chain and seatstays. After a bit of investigating I learned that this is a common issue with most UDH dropouts. If you wan't to learn more, look into the rabbit hole here: https://forum.customframeforum.com/t/udh-standard-or-scam/442
Sure, I maybe could live with the asymmetry, but I don't really want to since UDH was not really a deal breaker for me. And the brake mount kind of is.
The C-82 dropouts push the rear axle somewhat far back, and the landings for the stays don't have a lot of real estate to play with. In my intuition, and some hand drawings on millimeter paper, this would cause the rear triangle to not have space for post mount brake on the inside. So alternative dropouts are needed.
Well it's only money, and I needed to get the new chainstay anyway...
Back to biketubing.com and we end up with non-dimpled chainstay and some Paragon snap ring dropouts in steel:
These things are great for a couple of reason which I'll explain later.
But now I wan't to watch some One Piece, and this thing is taking way too long to write anyway, so I'll continue in the next episode where we take a look at the geometry and probably get into melting some brass.
-Emppu
Senast ändrad: